Thursday, November 18, 2010

Fun with Blocks

Wooden blocks aren't just for little kids. The nifty thing about blocks is that they are so very versatile; which, in turn, allows you to be so imaginative with your projects.

For this project, my wooden blocks were just screaming Christmas- but in French.

I'm so happy with how they turned out. :) I know that a few sets of them will be sent out at Christmas time as gifts for people.


Materials:

*DSP: Holly Jolly paper
* Modern label punch
* Defining Alphabet set

~~


Mini Milk Carton Bird House

To be frank, I was scared out of my wits with the mini milk carton die. I tried it a few times, but I couldn't fold it right- until I watched this video of Dawn Olchefske's on You Tube. I suggest to watch it- she really makes this die super easy!!!!

I found that I also had to use the extended cutting plates, top and bottom with my die. The die "for some people" can be used with just the regular cutting plates, but for me, I needed the extended plates for the die to feed through the machine properly.

Okay- I loved Dawn's little birdhouse so much that I just had to case it. Thanks Dawn once again for such a great video!!!!
Materials:

* Paper: Early Espresso, Old Olive, Bashful Blue
* Bashful Blue ribbon
* Big Shot die: Mini Milk Carton, texturz Perfect Details
* Stamp Set: Tiny Tags
* Old Olive button

~~

Monday, November 1, 2010

Halloween Goodie Bag Special

Halloween was amazing here last night!!!!

We had just over 100 kids come to our door. We probably would have had more, but our house, even though it was dressed up to the nines, was being skipped by a lot of kids. We live across the street from a bay, so the majority of the little ghouls and goblins would just cross the street, hit up the bay, then cross back at our neighbours house. A neighbour who lives in the bay came by later and told us that she had just about 200 kids. That's so crazy!!!!

So, if your child received one of my Halloween Goodie Bags last night, then I have a special treat for you!!!! As a thank you, you will receive 10% off of your purchase until November 7th 2010. Just email me or give me a call [1-780-932-4493] and I will place your order for you with the discounted price.

Happy November everyone!!!!

~~

Monday, October 25, 2010

In Colour Happy Birthday

The Scallop punch makes such a sweet little flower that just adds that special little touch of class to your project. The card highlights this years "In Colours" Bashful Bride, Pear Pizzazz, and Poppy Parade. The background image is stamped from the Hostess Level One set "Punch Potpourri" that has been stamped in Versa Mark the white embossing powder was heat embossed to it. One of the things that I absolutely love about Versa Mark is how it gives you the ability to create your own designer paper with the use of stamps.


The DSP is the In Colour Hostess Level One pack. It looks so pretty in the flower and backing the white sentiment. Lastly, I used the Glimmer Brads in Pear Pizzazz from the holiday mini to give the card a hint of sparkle. :)


~~

Friday, October 22, 2010

3D Ornament Card


This card was so much fun to make. After seeing Julia's card on SCS, I found my inspiration for this card. You can view her inspiring card here.

Laying stamped Cherry Cobbler ornaments from the Contempo Christmas set, I back it with an embossed whisper white cardstock that had been layered in Cherry Cobbler and Old Olive. A strip of Jolly Holiday and some silver ribbon complete this contemporary card.


~~

Top Note Christmas


I love the looks of a quilted Top Note. I wanted to create a Christmas card that incorporated the quilted Top Note. I also really want a card with the Candy Cane DSP from the holiday mini too. This paper is so pretty and the colours that are in it are stunning for Christmas. I placed it on a Baja Breeze cardstock and finished it off with a red satin ribbon. The sentiment is from the Four the Holidays in Garden Green.


~~

Thursday, October 21, 2010

Halloween Goody Bags


This year for Halloween, I decided to put the treats in a home-made bag. Aren't they cute? I need to make around 100 of them, so I wanted to do something that was quick and pretty easy.

Once again, I utilized the Big Shot. I used the versatile Top Note die for the cover in Basic Black and Pumkin Pie cardstock. I had some retired Halloween DSP, so I figured that this would be a great way to use it up. :)

The stamp is Batty For You- I punched it out using the 1 3/8 circle punch, then layer it onto the scallop circle punch. I just used black satin ribbon to add that finishing touch to it.


~~

Very Merry Christmas Wreath


This card was a blast to make. I used Garden Green and Old Olive cardstock and punched them out with the stars punch to create the wrath, placing it on a Very Vanilla base. The holly was made with the circle punch from the Itty Bitty punch pack. I then added glue from the two-way glue pen and dipped them in dazzling diamonds glitter. Too cute!!!! The DSP is Jolly Holiday that has been backed with Old Olive. I finished it off with the Four the Holidays sentiment stamped in real red and pulled it all together with a red satin ribbon.


~~

Tuesday, October 19, 2010

Season's Greetings Christmas


This is the second card that I created for the stamp-a-stack. Both this card and the Gifts of Christmas card will be featured in the next, upcoming stamp-a-stack.


This card was made using acetate paper, then lined with Cherry Cobblers and Whisper White. I used white Staz On ink to stamp the snowflakes onto the acetate paper. It is finished with a ribbon of either red or white, pearl on the star, and either crystal effects of dazzling diamonds on the stars in the tree.


Considering that it's white on a white background, I am using a red background to show the white snowflakes in the clear card. This card is simply stunning in person, the pictures do not do it justice.


~~

Gifts of Christmas

For my very first Stamp-a-stack I created this card. I wanted to use non-traditional colours and I think that blues are a very elegant Christmas colour combination. I used the Level One In Colours DSP in Concord Crush, along with Concord Crush paper to back the Dove and sentiment.


In addition to this, I used Bashful Blue cardstock that was embossed using the Final Press embossing folder in the Big Shot. The Dove was given extra glimmer by using Dazzling Diamonds glitter.


I tied it all together with an elegant white satin ribbon and two silver balls.

~~

A Cute Christmas

Have yourself A Cute Christmas- with the A Cute Christmas stamp set!!!!


This stamp set is just so, well, cute!!!! I used a Kraft base with Garden Green and Whisper White cardstock. I tied the colours together with three buttons.

The trees are a trio stamp, so I ended up stamping the image twice with Staz On Ink to create a "banner" of trees. I used an blender pen to give it a quick brush of colour. I didn't worry too much about staying inside the lines or getting everything completely coloured either- I feel that's part of the charm of the stamp set- it's very laid back.


~~

Sandy Claws Christmas

Some stamp sets are just too darn cute to retire.


I *heart* Sandy Claws so much!!!! It was a set that was before my Stampin time, so I ended up having to hunt it down, luckily another demo was willing to part with it for me. :)

I decided to go with the "retired" theme and use Bermuda Bay ink on the card, which, in my opinion, looks pretty good with the Cherry Cobbler base.

We know a few people who are traveling south during the Christmas season, so this is going to be the card of choice to send them.

~~

Since Halloween is right around the corner, I figure that I should stop making some Christmas cards and start marking some Halloween ones. This card was made using the DSP of Autumn Spice and the retired Halloween card stock.

I used the destressing tool to create the "rough" edges of the cardstock, which gives it the vibe of Halloween. Of course, the little Owls are from the Owl Punch. Isn't this punch just the greatest?
~~
My niece turned 7 years old on September 10th and this was the card that I made for her. She is very much into bright colours. I decided to try to think like a "7-year-old" so I used the crazy colour combo of Tempting Turquoise, Rich Razzleberry, and Old Olive.

One of my first experiences with Dazzling Diamonds, I gave the chicks some extra shimmer. When fully dried, they looked like stickers!!!!


This flower was made with the 5 petal Punch, then ran through the Big Shot with an embossing folder. I used shimmery ribbon and a button to tie it all together.


Unfortunately, the picture quality isn't the greatest- it was raining and miserable that day so I didn't have a lot of natural light and for some reason I thought taking it against a black backdrop would be smart.

~~

Hoot Loves You?


I made this card for my husband as a little token of my love for him. I forget the reason why I made it; he must have done something nice. LoL.The card is a 3x3, so tiny, tiny, tiny!!!! It's made using the new Owl Punch- which is super cute- a total must-have. :)

I am crazy for the DSP Autumn Spice, and with the Owl, I think that the DSP gives it a nice, warm Fall Time feel. I used the Textured cardstock [which is amazing] in the colours: Cajun Craze and More Mustard. For the Early Espresso I ran it through the Big Shot with the wood grain texture plate.

~~

Bleaching Technique with the Medallion Stamp


I got the inspiration for this idea from a very talented lady: Donna- another Stampin Up demo. You can view her amazing card here and all of other beautiful creations.

I used Soft Suede cardstock and ink, with a chocolate brown ribbon. I backed the face on a Very Vanilla cardstock sheet, with the new Decorative Label punch in Very Vanilla as well for the sentiment.


Using just standard household bleach, some rags, and a metal sheet I dipped the Medallion stamp into the bleached rag, then applied on the paper. I suggest that you "practice" this before a little bit on spare paper so that you get the technique down.

The best thing about this technique? When applying the second step [the now inked Medallion stamp in Soft Suede] you don't have to be perfect with it. I purposely went offline to create that "vintage" feel. I distressed the Soft Suede cardstock that the Medallion is inked on, then pasted it to Very Vanilla that had been sponged on the edges, then pasted that onto the card backing in Soft Suede.

~~

Matchbox Box


This box was a hoot to make. It was so easy with the Matchbox Die and the bigshot. I used kraft cardstock as the base, then dazzled it up with a wrap of Night of Navy and DSP in the same colour. I wanted to emphasize how the matchbox works well at holding nicknacks for the ladies at the class, so I decided to do a "tea theme".

I wanted to add depth to the image from the Tea-riffic stamp set; this look on the cup and saucer was achieved very easily- by using an aqua marker and some ink. It game it that watercolour look that is so classic and suited the tea theme.

~~

Sunday, October 17, 2010

Upcoming Christmas Events

Upcoming Christmas Events!!!!

~~

Review: Martha Stewart's Scoring Board


If you are like me, then you know the trails and tribulations that scoring can create. When I first started paper crafting, I didn't know that all these fancy tools and products even existed. I knew that many people crafted, because stores like Michaels and Stampin Up were around, but I didn't actually take the time to learn the the techniques that make crafting super easy to do. I kind of wish that I did since my very first encounter with stamps and a paper cutter were our wedding invitations. Man, those would have been so less time consuming if only I knew what I know now!!!! However, the awesome memories that were created and the many a bottles of wine that were consumed, just add to the warm and fuzzy memories of our wedding. *Sigh*

Anyway, one of the biggest hurdles in my life is a straight line. I blame it all on my childhood of course, that and my lack of sense of direction, but that's another blog post. I think I'm the only one in this world who can get lost for almost 3 hours with a GPS unit, two paper city maps, a Blackberry with Google maps on it, and screeching on Facebook like a mad woman, hoping someone will help- to no avail, I was still lost until I found the Whitemud- in which I took straight home and cried like a little school girl. I never did find where I was trying to go.

Back to the original topic. My guilty little secret is that I cannot fold anything straight nor can I cut straight. I do blame it all on my childhood, I am left-handed so I could never use scissors properly and it was the 80s, so there wasn't anything made to adapt to us southpaws. I can remember how many times I would try to cut paper, only to find that the paper just folded in the scissors instead of actually cutting. I couldn't use a ruler because the numbers were on the wrong side- so my measurements would get screwed up. It was horrible. I would try to make paper dolls or snowflakes and I would end up with dolls missing arms or snowflakes that crumbled when opened.

Last year I stumbled across a website promoting the ScorPal- I thought this was the coolest thing ever and spent hours upon hours watching YouTube videos of people scoring and cutting. I thought it was the greatest thing. I would have ordered it then and there except I seriously didn't want to pay the shipping price to Canada.

I knew that Michaels carried the Matha Stewart version of the ScorPal so I waited until I had a 40% off coupon to get it. I finally decided to take the plunge and went to Michaels in search of MS's version. With the coupon it was around $15.00 Canadian, so I figured it was a great deal. The cashier told me that she had one and loved it- so that made my purchase feel a bit better- until I couldn't use my coupon because it was already reduce to 30%. Oh well, I had to pay a few extra bucks, no worries.

Review of Product:
Overall, it's a good tool to have. Be careful though, I have almost lost the little scoring tool like 10 times, it keeps ending up in my recycling bin [no garbage bin for this green savvy girl] so put it in a good place where it won't get lost. In fact, there is a compartment designed for the tool, but that's too easy for me. ;)

The scoring tool is a little flimsy for me, I'm scoring 100 sheets of projector paper for my Christmas stamp-a-stack tomorrow and the tool keeps bending because of the amount of pressure that I'm using. It would be awesome if it was designed with a little finger notch on the top, but really, it's just a minor flaw.

I like how many lines there are- every 1/8 is a line, which is great for when you need to score details. It works really well on heavy cardstock and obviously can be used for projector paper- yeah for clear cards!!!!

I would definitely recommend purchasing one, it makes a crisp, clean line and scoring is super easy to do on it, which is nice when you have a lot of cards to make or don't want to change out the blade all the time on your cutter.

~~

Thursday, August 5, 2010

Top Note Quilt Card


I received my inspiration for this card from Susan [Soozie4him from SCS] stunning Top Note Quilt Card. I absolutely loved how she incorporated the medium jewelry punch in with her Top Note quilt. I wanted to do something like this, so I spun my own rendition of her card. Thanks Susan!!!!
I used another Top Note underneath the quilt to give it some added highlights and to make it go pop. This card is just like a regular quilt, it works great with spare little pieces of paper that you seemingly always have lying around your crafting space.
Once I get my craft room back: it's currently housing our HUGE dog crate for my 18 week 40+ puppy. We had company over the long weekend, so our spare bedroom where puppy usually sleeps was being used, so puppy took over my office. Fingers crossed that I can convince my hubby to take it apart and move it back to the spare bedroom tonight. :) Anyway, once I get it back I'll post a picture tutorial on the quilt cards.

My ribbon and twine will be posted under the "Tips and Tricks" link, it really is super simple to do.
Supplies:

* Stamp set: Tiny Tags 118091
* Card stock: Crumb Cake 120953; Whisper White 100730; assorted DSP
* Ink: Marina Mist 119668
* Punch: Jewelry Tag Medium 117190
* Top Note for Big Shot 113463
* Perfect Polka Dot embossing folder for Big Shot 117335
* Hemp Twine 100982
* Buttons
* Ribbon

~~

Welcome


This welcome card was so easy to do. The best part about it is all the different textures that are going on. It's a busy card, but not overbearing by any means. It has a rustic feel to it, kind of like shappy chic meats the country.

My must have tool is the Cutter Kit. I love the 7-sided destressing tool. One of the biggest highlights of the destressing tool is that it adds a bit of forgiveness to cardmaking. If your lines aren't cut straight or if you are mess up somewhere along the lines, you can always destress it. That way, it looks like your mistake was on purpose!!!!
The other texture plates from the Big Shot make the it a worthy purchase all on its own. Not to mention all of the other cool features that the Big Shot can do, but by far, the texture plates are a quick and easy way to add depth and dimension to your project.
I think once the new neighbour moves in two houses down, he's a widower, I'll make another one of these cards, except in more male orientated colours. I'll attach it to a basket of cookies [I love baking and since rejoining Weight Watchers I don't DARE make cookies for myself or my husband].

Supplies:
* Stamp set: Happy Together 114314; Warm Words 115108 [retired]
* Card stock - Poppy Parade 119793; Pear Pizzazz 119795; Whisper White 100730; More Mustard 100946
* Ink - More Mustard 103162; Poppy Parade 119782
* Hemp Twine 100982
* Cutter Kit 106958
* Backgrounds 1 114512; Texturz Plates Kit #4 114531

~~

Children's Birthday Card


I created this card for one of my club meetings and it was a huge success. The girls all loved the card, and loved "Fox & Friends" even more!!!! They plan on using the cards for their children's friends upcoming birthday parties. I love knowing that the cards that we make at club are cards that they will actually use. :) If you don't already have "Fox & Friends" I seriously suggest you get it. It is so versatile because it can be used for scrapbooking, baby showers, little kids cards, or even cards for adults who are animal lovers. I have used this stamp set twice now, one in a workshop now this time in club- and every time there are some who fall madly in love with the set and end up ordering it, completely happy with their selection.

You will see many more cards with "Fox & Friends" coming soon, especially around Christmas time.
Supplies:
Stamp set: Fox & Friends 117020; Teeny Tiny Wishes 115370
Card stock: Whisper White 100730; Pumpkin Pie 105117; Daffodil Delight 119683; Real Red 100052; Marina Mist 119682
Inks: Daffodil Delight 119667; Marina Mist 119668; Real Red 103133

~~

Best Wishes


The whole time while I was making this card, I kept thinking about weddings. Maybe it was because of the theme of the card; the little bit of elegance that it provokes. It was one of the first time that I used the VersaMark watermark ink pad, so I was thrilled at the outcome. I have a feeling that I will be using watermark more often now.


Supplies used:
* VersaMark 102283
* Cardstock - Daffodil Delight 119683; Crumb Cake 120953
* Ink - Early Espresso 119670
* Ribbon

~~

Thursday, July 8, 2010

First Workshop Cards

I was asked to be a co-demonstrator for a monthly club group. June was my first month to be the demonstrator, so here are the cards that we played with.

Thank You Note Mini Note Cards


These little cuties were the biggest hit of the club. Everyone loved them and are still talking about them a month later.


Inside the cards, we stamped an image and a thank you note.


Materials Used:

* DSP: Island Oasis 117173
* Cardstock: Whisper White 100730; Cherry Cobbler 119685; Chocolate Chip 102128
* Stamp sets: Itty Bitty Bits 120060; Trendy Trees 113258
* Punches: 1 3/4 scallop 119854; 1/2 small circle 119869; 3/4 circle 119873; 1 circle 119868; 1 1/4 circle 119861
* Paper Piercing Tool 116631
* Brads Metallic 119741
* Crop-a-dile

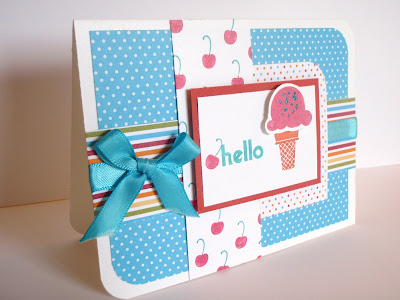
The Ice Cream Cone Card


I got the idea for this card from my upline. I absolutely love the Sweet Scoops stamp set; it just screams fun and summer all at the same time.


I wanted to a cardstock that had the same cute little cherries on it, so I created one. I stamped, using the SU markers, little cherries all over Whisper White cardstock, which tied in the cherries from the stamp set.

Sparkles were also used to highlight the sprinkles on the ice cream.


Materials used:

* DSP: Island Oasis
* Cardstock: Whisper White 100730; Cherry Cobbler 119685
* Stamp Set: Sweet Scoops 117078; Hello Again 113780

The Father's Day Card


This card follows the same template as what is seen on my demonstational video regarding the orgami shirt fold. The girls has so much fun with this card that they ended up making two cards each: one for their father and one for their father-in-law.


Materials used:

* DSP: Island Oasis 117173
* Cardstock: More Mustard 100946; Very Vanilla 101650; Chocolate Chip 102128
* Stamp: Well Scripted 118601
* Punch: Designer Large Label 119862
* Brads: Metallic 119741

~~